Thursday, August 2, 2012

Fenix HP10 (HP11) night blaster, the Sun on your head

For many years I used a Petzl Duo halogen/LED headlamp. It was in many ways the gold standard for cavers and rescue personnel, and it still the main headlamp you see permanently attached to rescuers helmets. The Duo Belt, same head unit but with a body mounted battery pack for extreme cold, was also used for winter explorers. The housing on the battery box of my Duo cracked after nearly a decade of use. It can be replaced, and I will probably do so at some point, but I took the demise of my Duo as a chance to look at more modern and compact options that were better suited for backpacking and climbing. The Duo wasn’t heavy, but it was a space hog. 2-3x the volume of more modern lamps.

I consider myself a night owl, if not somewhat nocturnal. If anything, the only time I really ever get up early is for hiking and paddling, though I often intentionally start out late in the day to time a sunset photo opportunity at a specific location. But because I’m pretty comfortable hiking, biking, running,  rock/ice climbing, skiing, (flatwater) paddling, and swimming at night -among other pursuits, I tend to not really concern myself with the time I start an adventure when I don’t have a particular reason to do so.

Because of my affinity to spend time in the dark, I really prefer to have a good headlamp that meets the following criteria.

  1. Uses AA batteries which are still the most common for multiple devices. Two way radios, GPS, camera strobes, DSLR battery grips, and the few remaining non rechargeable point and shoot cameras all take AA batteries. This means I only need to carry AA batteries and not multiple sizes (usually AAA is second most common). A second factor for AA batteries is the availability of AA Lithiums. These are not cheap, but they are easily found at any big box store and they work in extreme cold. they also negate the weight advantage of AAA vs AA (based on 3 AAA alkalines vs 4 AA lithiums).

  2. Has a seperate battery compartment and lamp housing for balance and comfort. True, while front mounted lamp/battery combos are usually smaller and lighter and you can lay down with them on, they aren’t as good for active pursuits. They tend to bounce and sway and usually lack a 3rd over the head top strap for security and stability. 

  3. Rugged and waterproof. My Petzl Duo was fully submersible down to several dozen feet, and while I never went snorkeling or diving or underwater caving with it, having piece of mind that a little rain or snow or even the unintended flipping of a canoe wouldn’t be the death of my light source is very important.

  4. DEDICATED POWER SWITCH AND MODE SWITCH. With all the good options for the first 3, this was and still is perhaps the hardest option to find and thus it’s in bold. One of the things I liked about my Petzl Duo was it’s simple two switch lever setup. Up/Down/Middle. Up and down were for either lamp (halogen or LED module), middle was for power off. In the middle setting the switch locked out so the headlamp couldn’t be accidentally turned on, and this was a feature that made the Duo a favorite of mine. The Duo lever switch worked extremely well with gloves and mittens. Unfortunately, most LED headlamp makers like to have just a single switch that controls all the various settings. So with many headlamps you have to cycle through 6 modes (or more) to get from power off back to power off. Ideally, in a dual switch setup, one switch controls power on/off and one controls output adjustment. 

  5. Power output. At least 100 lumens on high with a lower setting of 10-20 lumens.

  6. Battery life. Something that would last 3-4 days of intensive use at low to medium power.

  7. Beam quality. Lumens are one factor in quality of light output, but the type of LED bulb and it’s color balance, the reflector (collimator in LED tech), and the throw of the beam all make for better and worse beams.

  8. Cost. Under $100.


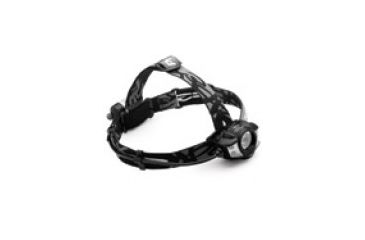
Once I ruled out all the headlamps that weren’t AA and didn’t have a dedicated power switch, I was left with really a very small sample. Among that sample was the Fenix HP10 (now replaced by the 277 Lumen HP11, which I also own) and it’s 225 lumens of night blasting, blindness inducing, pure white laser light. This lamp met all my criteria but was from a name I had not heard of before. After reading the reviews, and visiting the associated light enthusiast sites, where every feature is scrutined, tested, and the lamps are even disassembled, I placed an order for the Fenix HP10.


It turns out Fenix has a long history in handheld and tactical lighting. It also turns out that these aren’t over inflated specifications, but they are actually verified by enthusiast testing, complete with tear downs and inspection of the internal components. The burn times listed below were extremely accurate in testing, as was the Lumen output.

Specs for the Fenix HP10 are impressive: IPX-8 waterproof (certified for continuous submersion under operation), beam outputs of 7 lumens (210hrs), 50 lumen's (22hrs), 120 lumens (7.5hrs) 225 lumens (limited to 3 minute burst to prevent overheating but can run consecutively without problems, expect about 3 hours of continuous run time). Emergency warning flasher (44hrs), strobe (5hrs), and S.O.S (50hrs) settings. The bulb is a Cree XR-E (Q5) with a scratch/shatter resistant anti reflective optical grade glass lens, surrounded by an aluminum housing with cooling fins. The body and battery box is polycarbonate for a total weight of 117g without batteries. 177g with 4 AA L91 Lithium.

Pros: met all the above criteria plus a compact lamp housing, metal heat fins allow the 225 lumen burst mode to run continuously (even if it does revert to 120 after 3 minutes, simply press the button to reactivate 225), amazing light output at over 200 lumens, tight beam, accesories like an area lamp diffuser, and a hiking/close task diffuser. Flat back mounts well to a bike helmet or climbing helmet, headband can be removed. Housing doubles as a power lock. 


Cons: tight beam (just a little too tight), need for a snap fit accessory diffuser, no physical power lock but the housing doubles as passive lock when in upright position, small buttons are difficult to use with gloves, impossible to use with mittens. Straps are small and flat back (on lamp housing) isn't super comfy on a bare head when hiking for hours in the dark (worn with a hat I never notice the back). 

First, at the risk of ending the suspense, let me just say that this headlamp is so good, I will really just cover the minor cons and how to fix them to make for a near perfect headlamp.

As far as the cons, the only one that really can’t be fixed is the size of the buttons. Unfortunately, this is pretty common on the new compact LED headlamps and really can’t be fixed.

Another con is that the beam is very focused and thus has very little spill. It is almost a bit too hot (focused) at the center and can be distracting for close quarters task, and this includes hiking on rugged terrain where you are watching your step. However, with the snap on diffuser, the light is nice and even.

With the diffuser attached there are some pros and cons. First, it’s a press fit flip up diffuser. It is fairly secure but if you were thrashing through brush, or in the close quarters of a cave or swimming in the water, it could possibly pop off. Also because it flips, it can create downward glare onto the face/eyes of the user. The solution is fairly simple 1) make the edges of the diffuser opaque (paint, nail polish, etc) 2) push the lamp housing a little further up on the forehead. 3) attach some sort of blinder below the lens 4) simply wear a brimmed hat and problem solved. The snap on diffuser isn’t all bad. You can buy a few spares and paint them various colors. Red for night vision or sneaking around huts after quiet hours. Green for reading maps in the dark.

The second problem with the diffuser, is that while the undiffused beam on low (7 lumens) is actually bright enough to hike with, it really needs to be bumped up to the second setting (50 lumens) once you go diffused. I should note, most consumer headlamps high beam is about 40-60 lumens, this is level 2 on the HP10.

The tight throw and low spill of the beam can be easily fixed with a layer or two of screen protectors from a cell phone or even Scotch tape. Ideally, the old style resistive (stylus based) protectors that aren’t quite clear are best. I added two layers of Invisishield and the beam almost doubled in diameter, if I could find my old “Write Right” protectors from my PDA days, I could do even better. This simple fix makes the snap on diffuser virtually unecessary and enables the HP10 to be used on low beam most of the time while on the trail.

**Since I initially wrote this review, I lost my initial diffuser but I ordered 3 more to paint red and green. Yet, I haven’t replaced the clear one. I decided to solve the beam tightness with clear screen protectors alone and have it perfect for my needs.

A neat feature of many Fenix lamps, including the HP10, is a snap on area light diffuser. This wide area globe can be found for under $10. However, if you have a spare 35mm film canister in your house, it should snap right on the housing. On low beam this is great for reading in a tent, but on 50 lumen setting it can light up a campsite. It’s about as bright as a 60 watt bulb when hung from a overhead line.

Wondering what the strobe setting is good for? Well, if you and a few other hiking mates have HP10’s with globe diffusers, you can each color them and set up a disco in the backcountry. What better way to end a hard day of hiking than with a little clubbing to the beat of nature.

How does the HP10 compare to the competition:

The short answer is there really isn’t a headlamp that completely matches it. It’s brighter, burns longer, more rugged than anything else on the market. Here is the best the competition offers under $100.

Petzl Myo RXP ($75-90): It’s maximum of 160 lumen boost mode isn’t quite the HP10’s 225 blinding lumens, but it’s more than enough based on the rare times I have even needed 120 lumens. With only 95 hours of burn time at low power (8 lumens) using the 3 AA battery pack, the RXP doesn’t quite offer the long term lighting of the HP10.


Although Petzl claims the RXP has much longer burn life than the Fenix, it is largely misleading. Petzl was able to boost the RXP battery life largely due to the regulated (voltage controlled) processor in the headlamp. That control merely means that the light eventually gets dimmer at any given setting until depleting the batteries. For example At 50 lumens (which both the HP10 and RXP have a setting for) the RXP claims 56 hours to the HP10s meager 22. This appears an impressive feat, however, the RXP produces 51 lumens for 3 hours while the HP10 produces 50 lumens for 22 hours. By 10 hours, when the HP10 is pumping out 50 lumens of pure white light, the RXP is down to 8 lumens. A positive for the RXP is that you can select the 3 power modes you wish to use. For example, the HP10 is preset to 7, 50, 120 and 225 and cannot be changed. The RXP allows the user to set 3 levels from the following Lumen outputs: 8, 13, 17, 25, 34, 51, 59, 71, 85, 140. I would probably opt for 8, 25, and 59 (160 Lumen boost is always available regardless of preset outputs). However, even at 25 Lumens, the RXP only has a 10 hour burn time before it drops to about 10 Lumens. So the HP10 burns longer at 50 Lumens than the RXP at 25 Lumens.


On the positive, the RXP has a proper built in diffuser that works the same as the HP10 without the press fit issues. I should note that the RXP diffuser has a different issue than the HP10 diffuser. Rather than glare from the diffuser, the RXP cast a shadow. The RXP is also not waterproof, it is only IPX-4 (protected against splashing water). IPX-4 is probably plenty for hikers, but a good thunderstorm and some tropical storm force wind could potentially test this level of sealing.

Like the Fenix HP10, the Petzl Myo RXP offers a power switch and a level switch.

Black Diamond: Sadly, BD Equipment, one of my favorite companies, offers nothing comparable in power or features.  I believe it's current brightest headlamp is now around 100 lumens. Also, BD refuses to seperate the power and level buttons, prefering to stick to a single button for all functions. Until they can clear up their UI/poor design nightmares, I'd steer clear of BD headlamps.


Princeton Tech Apex ($60): The Apex offers IPX-7 waterproofing, which means it can be submerged and operated at 1m for 30 minutes. With 200 Lumens maximum power it is very close to the blinding nightime faux Sun of the HP10. Like the Petzl RXP, the Princeton tech is electronically regulated. However, Princeton Tec is more upfront with it’s burn times. Unlike the Fenix or the Petzl the Princeton Tec Apex uses multiple LED bulbs to control light and power consumption. The lower power settings use 4 wide angle low powerLEDs for wide area lighting, eliminating the need for a diffuser lens. The power output from these LEDs is 12 lumens (14hrs), 40 Lumens (8hrs), 85 Lumens (8hrs), 200 Lumens (0.5hrs). From the numbers you can see that while the 4 low power LEDs eliminate the pesky diffuser, they don’t offer much benefit in terms of power savings. Like the other units, the Princeton Tec does burn for longer than it’s stated times but at lower power output. Maximum burn time for the Apex is 150 hours on low power.

Conclusion:

I’ve been a Petzl fan for many years, perhaps even to the level of being a fanboy, I would have probably not have hesitated to by the RXP had it been available when I bought the Fenix HP10. However, because the RXP uses 3 AA batteries, rather than 4, it sacrifices significant burn time and perhaps power output. Beyond that issue, the RXP suffers from diffuser issues itself and it lacks the waterproofness. So it comes down to Petzl’s name or Fenix specs. I have always liked Princeton Tec’s specs and price points, but I’ve heard negative things about their headlamps durability. I also am not convinced eliminating the diffuser hassle is worth the tradeoff of the extra power consumption of the 4 LEDs. Assuming you don’t care about burn times, the Apex is a worthy option.

Competition is what drives innovation and Petzl and Princeton Tec now have another competitor in the marketplace. All the above headlamps are excellent, but for the $45 I paid and the versatility of the HP10, I do not think there is a better lamp on the market. 

Follow-up:

Look for my review of the HP11, while I haven’t spent a lot of time with it, I can say it’s nearly as good as the HP10, improved in many ways, not as good in others. But it gives you 277 lumens for about the same price ($50-70) and equally good battery life.

Off for a trail run with the night Sun.

Thursday, July 19, 2012

Pentax, Ideally Designed for Adventure in the Mountain Environment

There is no doubt that for most people a $1000 SLR is expensive. However, in the grand scheme of camera prices, $1000 is relatively middle tier and the thought of losing one to the forces of nature or in pursuit of adventure is somewhat bearable. But should your camera be at the mercy of nature?

I've been using Pentax gear for almost 20 years. I've owned and shot top end Nikon SLR cameras and glass, as well as owned a handful of various brand high end digital compacts in that time, but never have I felt like my money was better spent then when I was using Pentax gear.

Pentax SLR cameras consistently offer top notch image quality. They also offer rugged build and sealing to go with a solid lens lineup, including sealed zooms and pancake primes.

Because Pentax doesn't battle for dominance in the professional photo journalism market, it isn't forced to hold back technology for top end cameras, and it is able to concentrate on system size and ergonomics that professional outfits might not care about. This simplified technology structure allows consumers to get professional level equipment at relatively bargain prices.

Below is a great example why Pentax gear is ideally designed for outdoor adventure in a mountain environment:


Wednesday, May 23, 2012

Food For Thought: Fueling the Great Range


For my birthday in June, I will be doing the Adirondack Great Range. The hike is currently ranked number three on Backpacker Magazine's 10 toughest day hikes in America. The list is ever evolving, and sometimes particular hikes -such as the Devil’s Path or Presidential Traverse- get dropped off, but the Great Range has been a staple on the list for years.


I got to thinking about what I will need to fuel me for the 20+ mile 20,000ft gain and loss day. I estimate I will need around 8,000-10,000 calories of total energy, though, I obviously won’t need to eat 8,000 calories due to my own endogenous fat stores. Not to worry, I'm not making fun of myself, even a very fit/extremely lean person has enough body fat to run a few marathons without additional fuel. This is precisely why I consider my “alpine gut” a survival tool.


Just like any non standard diet, being wheat, gluten, grain, soy and (generally) processed food free does pose some challenges.  So, the goal of food I bring is something that keeps me burning endogenous fat and feeling strong, but also keeps me satiated and my stomach from getting upset.


Since I have also been leaning towards the ketogenic (high fat, adequate protein, low carb) end of a diet spectrum for some time, consuming only about 100g of net carbs -sometimes as little as 40 to 60g- per day out of 2500-3500 total calories I don't need to bring a lot of carb laden foods. As a result, I should be able to perform much better without the need to eat a lot of carbohydrates during the day. The reason, of course, is that the machinery to burn fat as a primary fuel source is already in place.

A benefit I have already seen, recently, while on a fairly hard hike (13.5 miles + 4000ft gain), where I only consumed about 600 calories all day (including only 8 grams/42 calories of carbs), was that I never felt hungry or like I was crashing. 


Perhaps a pertinent example was this past weekend, I did just under 5000ft of gain in 7.5 miles, which is an effort ratio of 3.73:1, in comparison the Great Range is  about 2.8:1 (both ratios are versus flat land hiking). I estimate that I only consumed about 750-1000 calories while hiking and was strong right to the end, with no hunger, crashes or weakness. In fact, in spite of the extremely warm weather and intentionally going into the hike tired from hard workouts the previous two days, I either set or matched personal best up both trails, which are among the steepest in the region. So, even pushing the edges of the fat burning heart rate zone, I never bonked.

Although I could just go bonkers and carb out for a day, carbohydrates have a lot of negative effects when burned as a primary fuel source in athletes. These include inflammation, which is a big deal for a guy with two lumbar disks approaching their second decade of degeneration. But even a healthy person will recover much faster by simply removing acidic trending sugars from their diet. A more immediate negative of carbohydrate rich foods is blood sugar variations. By avoiding sugars, I avoid the spikes and crashes associated with blood glucose levels. Being on a more even keel throughout a long day should have some psychological benefit.

Since I’m endurance hiking in a low heart rate zone and always in a fat burning state of metabolism, there really isn’t a need to vastly change my nutrional intake from what I eat on a day to day basis.

Well, at least I hope there isn’t. After all, this is an N=1 study and I’m the guinea pig.

The following is my list of high calorie ketogenic promoting foods, along with some protein,and some comfort carbs that can be somewhat easily packed for a day hike. For the Great Range hike, I won’t be taking everything on this list, but it’s a good reference of options for future hikes of this difficulty. I included a little blurb of why I would take each item:


  • Coconut oil/MCT oil (a great source of easy burning fat calories, coconut oil is about 62% MCT, so it is a cheap way of getting expensive MCT into your body)
  • Dark chocolate (85-90%) (an excellent mix of fats, protein, carbs, fiber, and antioxidants. Aside from melting, almost a perfect hiking food)
  • Almond or hazelnut butter packets (calorie dense, mostly fat and protein, my replacement for sugar based energy gels...brand name I prefer, Justin's)
  • Pumpkin and sunflower seeds (calorie dense, mostly fat, high source of magnesium)
  • Raw almonds (calorie dense, something crunchy, same as the above nutrients)
  • Foil packed tuna, salmon or sardines (good protein source, almost real food)
  • Beef jerky (salty, chewy, almost required for a day on trail, protein dense)
  • Frozen guacamole packets (depending on temps...high in fats, calorie dense, can be sucked down on the move...brand name is Wholly Guacamole)
  • Chia seeds (in a gel form or mixed into coconut milk...an excellent mix of fats, protein, fiber...but they stick to your teeth for those summit photos)
  • BCAA’s (branched chain amino acid tablets or powder, these can be used as fuel and are necessary for endurance activities lasting more than a few hours, they will prevent your body from cannibalizing itself to get the amino acids needed for long duration endurance)
  • Canned coconut milk (good source of fats, high in MCTs which are a great source of energy, powdered option is available, but with sugar added, can be dumped into a Nalgene before starting to avoid lugging a can around. Ideally it should be kept refrigerated, so don't let it sit out of the can too long)
  • Powdered Coconut Milk (definitely should be avoided when possible, instead of 100% fat content, it's is about 80-90% fat, with a good amount of added sugar, but definitely an option)
  • High quality whey protein powder (don’t buy the junk at big box stores...mostly as a addition for coconut milk, but full of amino acids)
  • Boiled eggs (a complete protein source that is somewhat hike stable)
  • Boiled/baked potatoes (starchy carb, with a little salt on top a great trail snack, real -solid- food)
  • Turkey breast and goat cheese in a nori wrap (mmm, real -solid- food early in the day...downsides, low trail life)
  • Oat based granola bars (sort of wheat/gluten free, complex carbs, something different...consider it a comfort food)
  • Kind bars and Rise Bars(the almond and coconut Kind bar fits in with a ketogenic snack profile, plus a few carbs....the Rise Bar has 3 ingredients, Almonds, whey protein, honey; but like a Kind bar is not quite ketogenic and contains 20g of carbs per ~3oz bar)
  • Cocochia bars (lots of fats, some protein, and a negative net carb profile, almost perfect, too bad they are pricey and hard to find)
  • Homemade candied ginger with or without 90% dark chocolate coating (definitely not ketosis promoting, but ginger has more digestive enzymes than just about any single natural product on earth. It can cut gas, bloating, and an upset stomach. Plus, it has strong anti inflammatory properties. Oh and it tastes good!)
  • Coconut water mixed with green tea (a good way to replenish potasium, and the catechins and flavinoids in green tea are anti-inflammatory. The small amount of caffeine can offer some energy boost, but is probably insignificant to anyone who regularly drinks caffeine. Coconut water contains about 20g of sugars per 12 ounces, so this is definitely not a no sugar drink. It is, however, a much better alternative for those hiking slow enough that solid food is the primary source of calorie intake) 
  • Carrots and broccoli (both of these have a decent trail life and are pretty durable when stuffed in a pack, only downside is they are a little heavy in terms of calories to weight ratio. Eat them early in the day to shed the weight) 
  • Beanitos bean and flax chips (this is one of a few areas where I diverge from a Paleo diet, I think properly processed legumes are generally positive in moderation, and Beanitos are a great example of that. Salty -but not too salty-, crunchy, packed with energy and plant based proteins. They are low glycemic load, and have absolutely no corn or wheat in them. )
  • WATER (as Dr. Stacy Sims makes clear, you can recover from low blood sugar but not from dehydration
  • S! Caps (Reading the book "Waterlogged: The Serious Problem of Overhydration in Endurance Sports" by Dr. Tim Noakes has really opened my eyes to the LACK of need for electrolytes under normal drinking conditions. However, when hiking we don't always get to "drink plain water to thirst" as Tim Noakes recommends we do. More often than not when hiking, we are drinking as much as we can at water sources because they are few and far between. S! Caps are only used to help move water from the stomach to the body and avoid sloshing around in the stomach, and to avoid potentially deadly hypernatremia when I am forced to down large quantities of water at water sources)

Happy hiking! 


Wednesday, May 2, 2012

I am the image of God: How the Spectre of the Brocken found me in the Adirondacks


I am the image of God: How the Spectre of the Broken found me in the Adirondacks


I’m definitely not a morning person, but when I smell an opportunity for good photography, I usually manage to surprise even the most cynical of my doubters -including myself. I’ve been burned many times by optimistic looking weather reports, but you can’t create an image without being on location in the first place. As Galen Rowell said, “You only get one sunrise and one sunset a day, and you only get so many days on the planet. A good photographer does the math and doesn't waste either.” Galen was a smarter man, better mountain athlete and better photographer, so I’ll take him at his word.

With that in mind, I planned a very optimistic day in late September; a day that involved a sunrise and a sunset, 170 miles of driving, 15+ miles of hiking, and 4000 ft of elevation gain, while dealing with the pitfalls of the immune response to the rhinovirus -the common cold.

On paper the plan seemed doable. Start with the Adirondack Balloon Festival in Glens Falls, and then summit Dix Mountain from Elk Lake.

Unfortunately, in late September, I came down with a rare cold and was pretty rundown. The upside is I’ve always felt better while being active and research backs up the fact that moderate exercise does boost the immune response in various ways. However, the same research shows that intense or endurance type exercise can harm the immune response. Your body does need rest when you are sick, but there is some grey area to how much rest it needs and how much it benefits from exercise.


Even though I was sick, I was coming off of some great hiking trips and very fit. I also had a big week long backpacking trip in the White Mountains upcoming. Factoring in all of this, I really wanted to get a good hike in, as well as go to the Adirondack Balloon Festival to take some test shots for my overdue review of the Pentax K-5 DSLR.

In a typical effort to prove just how stupid I can be, I decided with all my wisdom to do both the 14 mile day hike and the Adirondack Balloon Festival in the same day. This involved being in Queensbury before sunrise followed by a 10 hour hike that would probably start no earlier than a typical late morning start.


Grounded Due To Fog
Tethered balloons were grounded due to fog.


With what can only be described as an act of God, Aim and I were up and on the road in time to get to the Adirondack Balloon Festival well before sunrise. Unfortunately, the balloons were grounded due to fog.


Adirondack Balloon Festival
Inside of the envelope (balloon) from the basket.


Honestly, a launch isn’t neccessary to get great shots at the festival. If anything, the most interesting shots are the ground level stuff. We spent a long time walking around the airport. We were able walk around inside a partially inflated balloon and I was also able to get into a basket and get some great shots.


Fire Rescue
South Queensbury Fire truck detail.


By the time we left the balloon fest, it was close to 9am. We had an hour drive to Elk Lake and then a 8-10 hour hike in front of us.

Adirondack Balloon Festival
Flames from the basket burner into the envelope.
When they made me stupid, they really made me stupid. Run down and sick, I decided I would carry no less than 35lbs on this little endeavor, I had just 2 weeks until my backpacking trip to the rugged White Mountains Pemigewasset Wilderness. I like to be mentally prepared for long days under the weight of a loaded pack., and the best way to do that is to carry a loaded pack. Fortunately for this day, my gear included a fair selection of camera equipment and a tripod, rather than just a lot of water or dead weight.

The hike into Lilian Brook took us about as long as it did a few weeks before, when we had full multi-day backpacks and had to navigate the immediate aftermath of the hurricane Irene flooding and blowdown.

We refilled our water in the ice cold Lilian Brook, and set off on the ascent towards the Beckhorn. At this point the trail gained altitude quickly, initially up a slimey moss covered pile of rocks that probably doubled as a stream bed in wetter conditions. Aim wasn’t hiking very fast, but I felt pretty good. Our pace was definitely slower than I expected, but we’d be faster on the way down.

When we got to below the Beckhorn, the trail got slabby and a little craggy. Fun hiking, and also our first real views. We could see the cloud cover blowing in. Low clouds that make for great scenery.

Trail Dogs and Trail Chicks on the Beckhorn
Aim and Colvin on the Beckhorn.


Once we ascended the Beckhorn, we were greated by a truly amazing sight. The ridge of the Dix Range was split between cloudless and fully engulfed in clouds. You could literally stand 5ft in either direction and be in the clear or in the clouds. I have seen walls of cloud cover like this before, but never so distinctly divided along our exact hiking path.

Standing on the edge of the unknown
Dix Mountain's ridgline perfectly split by cloud cover, with Aim and Colvin on edge of the unknown.


We eventually reached the summit, which of course, was now completely in the clouds. Another trip to the summit of Dix Mountain without a view? I thought so, for sure.

For a short time we remained entirely in the clouds, but to the west it appeared to thin out enough that it went from opaque to translucent. At times it became crystal clear with an undercast.

Within minutes I noticed something I’d remembered vividly from a book written by my photographic idol, Galen Rowell. I couldn’t remember what it was called but I knew what it was. It was me, projected into the clouds from the suns beam. It was the Spectre of the Brocken.


I am the image of God: How the Spectre of 
the Broken found me in the Adirondacks
Moments like this remind me that every day in the mountains can be special.


The Spectre of the Brocken, as it is known, isn’t particularly rare. If you spend enough time in the mountains you will encounter it. It requires four things to come into alignment: 1) the sun needs to be close to the horizon (at least in the Northeastern US, maybe a higher altitude is ok in places with higher mountains); 2) the clouds need to be about the same height at the mountains; 3) the sun and the clouds need to have an azimuth of 180 degrees; 4) you need to be there to create your haloed image of God in his earthly form!


Verplanck Colvin Survey Bolt - Dix Mountain, NY
Original survey bolt from the Adirondack Survey of the 1870s.

As the sun moved in and out of cloud cover, and the Spectre appeared and disappeared, I worked a few different scenes from ground level to panoramas, but I was always looking for the next appearance of the Spectre of the Brocken.

The Views Are Just As Sweet...
Clouds and sun mysteriously obscuring the High Peaks Wilderness.


Ultimately, we ended up remaining on the summit much too long, until just a few minutes before sunset. We were greeted by all sorts of beautiful scenes from pillowy clouds surrounding us, to a sea of undercast over the Keene Valley, ultimately capped off by a pastel colored sunset.

Moody sunset over the Colvin Range
Sunset below the Beckhorn


The hike out should have been an easy 7 mile trip to the car, but the toll of sickness, lack of sleep, and just being physically tired from spending all day moving around with a pack on my back finally reached a breaking point. I was really struggling to stay agile on the trail, I fell a lot more than usual, and at one point I fell twice in a 15 foot stretch of mossy trail. I just sat down for a few minutes and collected myself. I felt like once we got back to Lilian Brook things would be fine.

Well, when we got back to Lilian Brook the world didn’t turn to sunshine and lollipops, I still had a long hike out over moderately rolling terrain, followed by an easy but mentally draining 3 miles of double track.

Adirondack Balloon FestivalWe finally got back to the car, but we were both too tired to complete the 80 mile drive without  resorting to a little nap at a rest area on the Northway. This nap turned our trip into a 24 hour day that was much harder than I anticipated.

In the end it was all worth it, I ended up with some unique shots at the Adirondack Balloon Festival, and I saw the Spectre of the Brocken along with other amazing sights in the Adirondacks. Despite the day being physically and mentally tougher than I expected, it was a staunch reminder that you can not create and image if you don’t get yourself on location.

Tuesday, February 21, 2012

A postmortem to Winter 2012


High Peaks from West Crane Mountain
January views of the High Peaks from the summit of West Crane Mountain. The photo is deceiving, as there was only about 7-12in of snow on the ground, much of which melted in the following days of warm rain.
 
March and April are historically the biggest snow months at elevation in the Northeast, and over the last few years winter hasn’t really stuck around until Presidents Day weekend, chiefly because of arctic highs forcing moisture snow) south into the coast and southern mountains. However, unlike this year, we’ve had a few false starts in those years. Plenty of snow, then a warm rainy spell with it's accompanying meltout. Enough that snowshoes and skis would have seen some justified use by Presidents Day, even if skiers and climbers weren't completely happy with conditions. 

This year, despite snow in the High Peaks and lower elevations right on schedule, it’s been pretty much shoulder season conditions since the start. It hasn’t been typical Northeast extremes keeping us in a state of perpetual November, just consistently mild weather. No record highs, but lots of 40 degree days with rain.

Looking at the climbing logs, it looks like it’s been a decent ice season for people putting up free climbs I couldn’t aid with a bolt gun. Some very ballsy and serious routes have gone up all over the Northeast. But Scottish mixed climbing has existed in conditions like this for decades across the pond, even if it is just now making a renaissance in the Northeast USA.

Skiers, on the other hand, haven’t had much to choose from. Unlike ice climbers, skiers -as a general rule- don’t get masochistic pleasure from finding the worst possible snow conditions and skiing.

While I’ve gotten a few trips out on ice, to date I haven’t actually needed my snowshoes. Granted, I haven’t needed them largely because lower elevation conditions are so poor I just haven’t wasted the fuel to get to the North Country’s 1000m+ elevations where snow can be found.  Uncharacteristically, I’ve yet to take a trip to Vermont or New Hampshire either. Often they have better conditions at various times of the winter. In the Adirondacks, above 2000ft there begins to be some sign snowshoes could be necessary, and I hear wonderful reports of snow upwards of 20-30 inches at 4000ft.

I haven’t really needed my winter gear at all. It’s been mild enough most days that I’ve worn my base layers and soft shell pants. Other than wearing my insulated boots because they are required for ice climbing/steep crampon terrain, I haven’t needed those either.

The lack of snow also has meant my camping gear has pretty much been mothballed. I love snow camping and winter backpacking. Pound out a perfectly flat tent pad where ever you choose, and sleep like a king in the quietness of a forest sound proofed by fresh snow. Camping on the solid sheets of ice that has replaced snow cover or the forest floor is a lot less fun.

Crampons, or rather the necessity of crampons, are a completely different story. These are standard gear from car to summit and back during 2012. Even in the Southern Adirondacks, where there was almost no snow at all on Super Bowl Sunday, we needed crampons the entire two miles back to the car, hiking on a moderately graded low elevation trail.

The most depressing fact is that looking at the NOAA CPC long range data, I can’t say I am particularly optimistic winter is going to start anytime soon. NOAA says that we will continue with above average temps into April, along with normal precipitation. Neither of these factors scream big snow systems or extended cold.

No doubt we’ll get a blizzard in April to muck up spring hiking and rock climbing season. Other than that, I don’t see our recently historic trend of 8 grand weeks of winter beginning in late February.

I suppose the silver lining is I didn’t fork out $220 on those Tubbs Flex Alps I’ve been eyeing since last winter. Maybe I’ll score a used pair over the summer for a bargain price. I’ve also driven 75% less than a typical winter, which is good for the wallet, good for the odometer, and good for the environment.

All that said, I like living in this part of the country because of our four “over rated” seasons -as Left Coasters and Gulf Coasters like to put it. So no matter what the benefits, it still sucks to completely miss out on the most unique of those seasons.

Winter 2012, you had so much potential, but you never really stood a chance in this cruel world!

Friday, January 13, 2012

Checking in for 2012

In my first blog of 2010, I noted how I don’t believe in New Years resolutions. Nothing has changed on that front, but the biggest change for 2012 for me will be a continuation of  what I started last spring.

At some point over the last two years I really began to notice how badly a traditional USDA endorsed carb based diet was for me, and then many months of research and tweaking my own diet and lifestyle affirmed my hypothesis. Unfortunately this flies against conventional wisdom (or stupidity), so you feel like it can’t be right. That said, this isn’t some fad diet, but a real science based lifestyle change that centers around eating unprocessed foods high in fats. For those that need some sort of planogram to eat correctly, it's essentially a very loose variation of the Paleo diet. For me it's pretty satisfying and easy to stick to, provided I have access to the foods.

Over the last 18 months, while busting ass and generally being in good cardio and functional muscle fitness, I never really achieved my fitness goals. As a matter of fact, this spring, summer and fall, I was probably in the best shape I have been in over several years. Colvin and I were regularly doing hard 15-20 mile hikes, and I had the highest mileage hiking year I have had since 2008.  

During that time period, I did notice that while on a wheat/grain based carbohydrate diet, like that of our USDA food pyramid, I was unable to really drop weight no matter how hard I pushed myself. I was fitter, but I neither looked it nor felt that fitness. Being barely fit enough isn’t good enough, I want extra left in the tank after a hard day in the mountains. 

Bear in mind that weight isn’t necessarily evil. It is, in my opinion -and based on studies-, often better to be 15lbs over weight and fit, than at your ideal weight and BMI and be sedentary. However, weight isnt good for connective tissue and joints, nor is it good for an ailing spine. Not to mention that you need to work harder for the same performance results when hiking or climbing. I guesstimate that at moderately elevated BMI, every 10lbs of extra weight is worth 1 YDS scale grade on rock. Thus, if i weight 190 when i should weight 170, i am probably climbing 2 grades lower. 5.8 vs 5.10 is a big deal, at least to me.


Science shows that a high fat and protein diet, in connection with a reduction of wheat and grain based carbs, is the ideal diet for endurance athletes. A mountaineer is an endurance athlete and should train and eat like one.

After fiddling with what works, I actually eat an inverse of the food pyramid all day, which keeps my blood sugar at a constant level. Eating doesn’t mean a full meal, but it can be just a handful of raw almonds and pumpkin seeds.  I consume gobs of good fat and protein (in the form of nuts, eggs, seeds, avocado, meats, greek yogurt/kefir, beans, olives and olive oil, dark chocolate, and cheeses), My carbs are sources that are complex and fiber based, or require more calories to digest than they provide.  Fruits juices, grains, breads, rice and simple sugars are pretty much not part of this diet.

The key is having good fatty food available; at work, in the car, when i get home, and at bed time (and no, eating before bed if you need to, will NOT make you fat, on the other hand poor sleep patterns might cause you to gain weight). Eliminating blood sugar highs, and resultant lows, will almost entirely kill "cravings" and keep your body out of starvation mode. Basically, eat to lose weight.

So for 2012, we (my wife gets the benefit of this too) will mostly be working on staying lazy. Lazy by making sure my Squirrel mix (160 cal per ounce of unprocessed nuts and seeds, 75% of which are fat calories) is always in my laptop bag, so I don’t have to scramble for food. Lazy by bulk cooking of foods that are high in healthy fats and protein just a few times a month, thus only really cooking 10-15 days per month.

Sure, it cost more time, effort and money to eat good, unprocessed grain free food, but with a little planning you can cut cost and effort to assure that something satisfying is always readily available.

Like with anything in life, it’s not enough to have a good plan, it's all about execution of the plan. Time to execute. 

Best wishes in 2012 and best of luck with your own goals!